Thursday 21 May 2020

Sketchup LESSON 4: Simple 3D Design Example for 3D Printing

Sketchup LESSON 4:  Simple 3D Design Example for 3D Printing
I started by making a 75mm x 25mm rectangle and raising it to a height of 25mm. Using the measuring tool I measured where the shapes were going to be. Then when making the shapes I made sure the ones that were going to be holes were 0.75mm bigger than the pegs. Next, I depressed the holes 15.75mm and raised the pegs 15mm, making the holes deeper than the pegs to give them room to fit. To finish I added my name and coloured everything.
I started with a 50mm x 50 mm square which I raised 25mm. Then when making the shapes I made sure the ones that were going to be holes were 0.75mm bigger than the pegs. Next, I depressed the holes 15.75mm and raised the pegs 15mm, making the holes deeper than the pegs to give them room to fit. To finish I added my name and coloured everything.

Sketchup LESSON 3: Printing Sketchup Designs on a 3D Printer

 Sketchup Lesson 3 Printing Sketchup Designs on a 3D Printer 

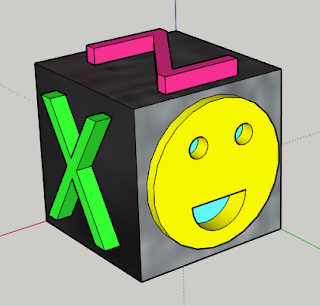
I made a 1'' x 1'' cube and added a X,Y,Z to 3 sides using the 3D text tool. Next, I added my name to one side and used the circle and ellipse tool to draw a smiley face on the last side. To finish I coloured everything.

Wednesday 20 May 2020

Sketchup Lesson 2 Rubic's Cube


~ Sketchup Lesson 2 Rubic's Cube ~

> >
First, I made a 5' x 5' cube. then I duplicated it and placed 9 of them in a 3 x 3 grid spaced 2' apart. Next, I duplicated the layer and stacked twice to get 3 layers with 2' between. Lastly, I created a column and duplicated it to have one in each corner. Finishing I coloured the cubes like a rubic's cube, painted the columns marble and added my name.
Like the first rubic's cube I started with a 5' x 5' cube which I duplicated 12 of and placed them in a 4x4 grid, spaced 2' apart. Then, I duplicated the layer and stacked it 3 times. Next, I added the columns and coloured everything. To finish I added my name.
 

Tuesday 19 May 2020

Sketchup Lesson 1 Tiles

~ Sketchup Lesson 1 Tiles ~


Lesson
I made the rectangles 5' by  15' and arrayed them in a 3 x 3 grid, 3' apart. Then I duplicated it 3' above and changed the colours and added my name to finish.
12 x 12
First, I made a 12 x 12 area to fill in. Then I filled it in to match the image by using a bigger square 12' x 12' and a smaller square 6' x 6'. To finish I changed the colours and added my name.
12 x 24
I made all the half squares 12' x 24', but turned some squares horizontal and kept the others vertical. Then I laid them out to match the reference image and finished by adding colour and adding my name.