Thursday 18 June 2020

Photoshop - Animal Skinswap 3

Statute of  of Liberty
Wood Texture
Gold Texture
Layers
Textured Statue of Liberty
Steps
  • Open Statute of Liberty image, use quick select tool to select the crown and mask out background and copy it onto a new layer using the Ctrl - j shortcut while selected. Do the same for the body
  • While the new layer is active, press Ctrl-Shift-U to strip away its colour and use Ctrl - J to duplicate the layer. This will serve as the base for the displacement layer used later. Do this for both body and crown
  •  Hide the most recently duped layer and Ctrl-click the new layer button while active on the displacement layer. Repeat for both parts.
  • Use the paint bucket tool to fill in the blank new layer with white. Repeat for both parts.
  • Select the displacement layer and filter it through the Filter menu with Noise > Median with a level of 5 and Blur > Gaussian with a level of 2. Repeat for both parts.
  • Merge the white blank layer with the displacement layer and duplicate it onto a new psd by pressing right-click on the layer and selecting "new" under the document option. Repeat for both parts.
  • Save it as psd file for use later and delete the current displacement layers from your layers. Repeat for both parts.
  • Open the wood texture file and drag it over to body document, by using the move tool and pressing shift over the tab.  Repeat for crown document with gold texture.
  • Stretch the texture to fit it over the body and crown.
  • With the Texture layer active, add a distortion filter through the Filter Menu using Distort > Displace and select the displacement file saved earlier. Use the numbers 40-40 for the x and y scale. Repeat for both parts.
  • Highlight the dragon layer by Ctrl-clicking the layer's image and then make the texture layer active and click the layer mask icon to remove any excess texture. Repeat for both parts.
  • Click on the texture's image on the layers tab change its blend to overlay. Repeat for both parts.
  • Add levels layer adjustment to the texture layer and change it to make it look great. Repeat for both parts.
  • Duplicate all layers and merge, hiding originals.
  • Change background and add watermark.

Photoshop - Animal Skin Swap 2

Original Dragon
Original Honeycomb Texture
Layers
Honey Dragon
Steps
  • Open Dragon image, use quick select tool to select dragon and mask out background and copy it onto a new layer using the Ctrl - j shortcut while selected. 
  • While the new layer is active, press Ctrl-Shift-U to strip away its colour and use Ctrl - J to duplicate the layer. This will serve as the base for the displacement layer used later.
  •  Hide the most recently duped layer and Ctrl-click the new layer button while active on the displacement layer. 
  • Use the paint bucket tool to fill in the blank new layer with white.
  • Select the displacement layer and filter it through the Filter menu with Noise > Median with a level of 5 and Blur > Gaussian with a level of 2.
  • Merge the white blank layer with the displacement layer and duplicate it onto a new psd by pressing right-click on the layer and selecting "new" under the document option.
  • Save it as psd file for use later and delete the current displacement layers from your layers.
  • Open the honeycomb texture file and drag it over to dragon document, by using the move tool and pressing shift over the tab. 
  • Stretch the texture to fit it over the dragon
  • With the Texture layer active, add a distortion filter through the Filter Menu using Distort > Displace and select the displacement file saved earlier. Use the numbers 40-40 for the x and y scale.
  • Highlight the dragon layer by Ctrl-clicking the layer's image and then make thetexture layer active and click the layer mask icon to remove any excess texture.
  • Click on the texture's image on the layers tab change its blend to overlay.
  • Add levels layer adjustment to the texture layer and change it to make it look great
  • Duplicate all layers and merge, hiding originals.
  • Change background and add watermark.


Photoshop- Animal Skinswap

Original Rhino
Original Leopard
Layers
Leno
Steps
  • Found an image of a leopard and rhino in similar postures
  • Use mask tool to get rid of backgrounds
  • Place leopard image over rhino and lower the opacity to ~ 50%
  • Select Leopard layer and go to filter menu and choose liquify
  • Check use backdrop and use rhino layer changing it to 50% opacity
  • Warp leopard skin to fit rhino body as well as possible and remove parts that stick out much using eraser tool.
  • After go to leopard layer choose 'multiply' blending option and add Brightness/Contrast adjustment layer and change as necessary to make it look good.
  • Duplicate all layers and merge them, hiding old layers
  • Change background, resizing leno as needed and add watermark.

Squirrelion

~ Squirrelion ~
Original Lion
Original Squirrel
Layers
Squirrelion
Tutorial Squirrelion
Steps
  • I started by taking the lion image and cutting out the background and excess body to get the head using a layer mask(refining it using the paint brush - black)
  • Then I took the head and placed it over the squirrel body using the paint brush on a low opacity setting to blend the neck area.
  • Next I created an two adjustment layers (one color balance and one brightness contrast) for the lion head to color balance it and adjust light levels so it would match the squirrel body better.
  • After I duplicated all the layers and merged it into one before cutting the squirrelion out to replace the background, adjusting the size of the squirrelion as necessary.
  • Finishing I added my watermark.

Wednesday 17 June 2020

Sketchup Lesson 5 -Cookie Cutters

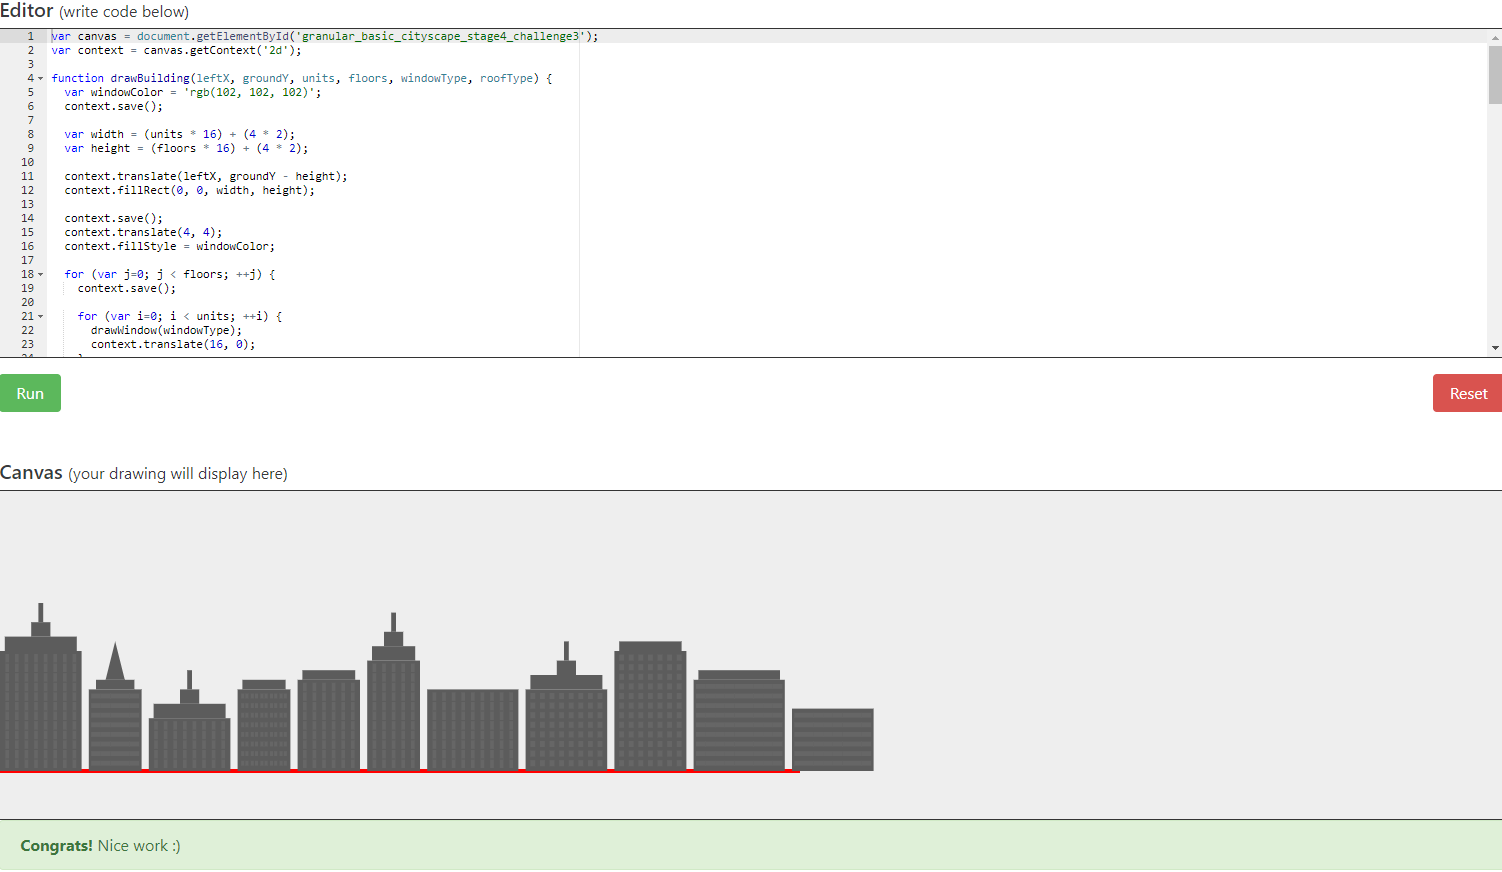
10 Hours of Coding Hour 10


This hour I completed the fourth and final section of the Basic Cityscape course to finish my learning about drawing with code.

Specifically,  I learned how to create a 3D illusion by making 3 rows of buildings and darkening the colors of the buildings in the back. A new function I learned about was the context.scale() which is used in the draw function to randomize the size of buildings. To create the final project I ran 3 of the draw functions with add color functions to get the cityscape.

In the future, I plan to continue my learning code by doing more work with python.

10 Hours of Coding Hour 9


This hour I completed the third section of the Basic Cityscape course and learned more about drawing with code.

Specifically,  I learned how to add some variety to the buildings by varying the types of windows in the offices and the types of roofs on the buildings. To automate this process I learned how to update my draw function in order to include variations by using the switch function. With this I can set it to use a different type of window or roof depending on the variable that enter into the draw function when calling it. By setting up multiple vars/cases I could generate random building designs.

Next hour, for my final hour I will be completing the fourth and final section of the Basic Cityscape course to end off my learning about drawing with code.